An average buyer spends about 20 seconds on a real estate listing online. Approximately 60% of that time is spent looking only at the photos. The data is clear: poor photos cause potential buyers to skip your listing in seconds, while professional photos can help your property sell 32% faster. So, in a highly competitive market, how do you turn your photos into a powerful sales tool that stands out from hundreds of other listings? This comprehensive guide will enable you to think and shoot like a professional.
This isn't just about pressing the shutter button. It's the art of telling a story, presenting a lifestyle, and sparking the feeling of "This is my home" in a buyer's mind. Over my 15 years in the industry, I've seen countless times how a single, well-angled balcony photo of a sea-view apartment in Suadiye, Istanbul, created a bidding war, or how a property in Göztepe that lingered on the market for its perceived darkness sold within a week after being re-photographed with proper lighting techniques. Now, I'm sharing this experience with you, step-by-step, to help you market your home in the best possible light.
The Power of First Impressions: Why Photos Are Everything
In the digital age, a property's "curb appeal" no longer starts at the curb; it starts on a computer or phone screen. Before buyers decide to see your home in person, they conduct a preliminary screening based on your photos. This digital storefront is the most critical stage in determining your property's fate. Your photos must convey not just the size of the rooms, but also the home's spirit, light, and potential.
The Art of Creating an Emotional Connection
People analyze with their logic but decide with their emotions. Real estate is no exception. Photos allow buyers to imagine themselves living in that home. A shot of a sun-drenched kitchen, a cozy living room perfect for family movie nights, or a serene bedroom to unwind in creates a much stronger impact than square meter data. The goal is not to sell "a 3-bedroom, 120 m² flat," but to sell the feeling of "a bright, spacious, and happy home."
Increasing Perceived Value
Professional, high-quality photos create the perception that your property is well-maintained, more valuable, and more desirable. Conversely, blurry, dark, or cluttered photos give the impression that the property is neglected and the seller is careless or in a hurry. This often leads to lower offers or buyers ignoring the listing altogether. Remember, a great photograph is one of your strongest assets at the negotiation table.
Preparation is 90% of the Work: The Pre-Photoshoot Checklist
Even the best camera can't make a cluttered house look good. The secret to perfect photos begins long before you press the shutter. This stage is about transforming your home into a photo studio and is just as important as the shoot itself. As I always tell my clients, every hour you spend on preparation can save you days on the market.
Step 1: Radical Decluttering
Buyers want to see the house, not your belongings. Excess items make rooms look smaller and more cramped. Adopt the "less is more" principle. Clear everything off countertops (except perhaps a coffee machine), remove personal photos, magnets, trinkets, and unnecessary furniture. Empty closets and cabinets by about 50%; it's the most effective way to show how much storage space is available.
Step 2: Depersonalizing
The goal is to allow buyers to envision the house as their own. Family photos, personal artwork, diplomas, or items from very specific hobbies make it difficult for them to project themselves into the space. Temporarily remove these items to turn the home into a neutral canvas. A buyer wants to purchase a space to create their own memories, not a home filled with yours.
Step 3: Deep Cleaning
Photographs, especially high-resolution ones, are unforgivingly detailed. Fingerprints on windows, dust on the floors, limescale in the bathroom, or grease stains in the kitchen will be immediately obvious in a photo. Consider hiring a professional cleaning service right before the shoot. Sparkling surfaces signal that the home is well-cared-for and builds trust with the buyer.
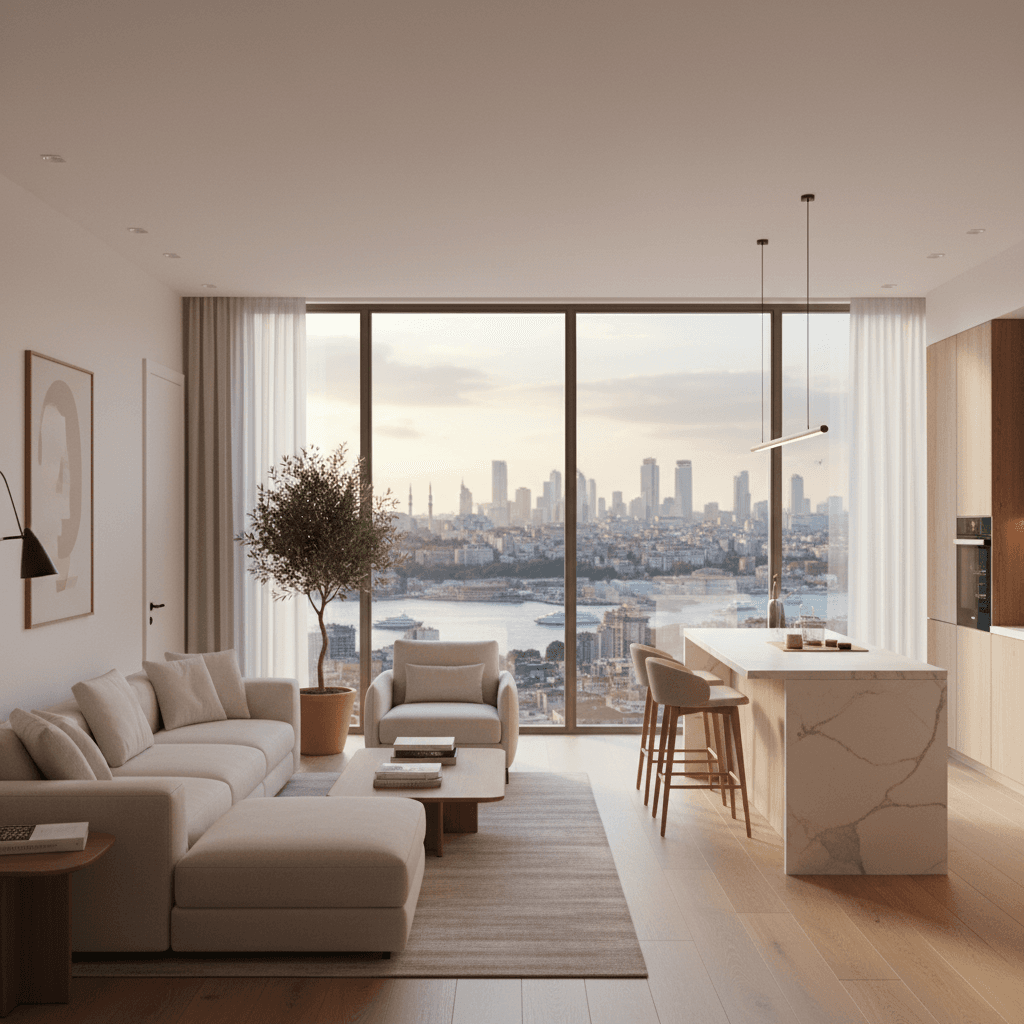
Step 4: Smart Staging
Staging doesn't mean emptying the house; on the contrary, it's about giving each room a purpose and a soul. An empty room doesn't convey its size, whereas a few well-placed pieces of furniture show how the space can be used.
- Living Room: Add a few neutral-colored pillows and a throw blanket to the sofa.
- Kitchen: Place a bowl of fresh fruit or a vase of flowers on the counter.
- Bedroom: Make the bed meticulously, like in a hotel room, and add a couple of decorative pillows.
- Bathroom: Replace colorful towels with white or neutral ones. Place a stylish soap dispenser and a small potted plant on the counter.
🏠 Ready to Market Your Home?
Let us unlock your property's value with our professional staging and photography services. Meet the Century21 Perfect team.
📞 +90 552 688 0195 | 📧 ashkan.ahani@century21.com.tr
The Right Equipment: Pro Camera vs. Smartphone
While modern smartphones can take fantastic pictures, they have some technical limitations when it comes to professional real estate photography. Your choice will depend on your budget and your property's value. But whichever path you choose, some basic equipment is non-negotiable.
Why a DSLR/Mirrorless Camera is Preferred
There are several key reasons why professional photographers use these types of cameras:
- Wide-Angle Lenses: This is the most crucial tool in real estate photography. They make a room appear larger and more spacious, but shouldn't be so wide as to create a fisheye effect (16-24mm is ideal). The wide-angle modes on phones often cause distortion at the edges.
- Larger Sensor: The size of a camera's sensor determines how well it captures light. Larger sensors produce sharper, less grainy, and more detailed photos, especially in low-light conditions.
- Full Manual Control: The ability to manually control aperture, shutter speed, and ISO allows for perfectly exposed photos in challenging lighting situations (e.g., a room with a bright window).
Can You Get Professional Results with a Smartphone?
Yes, with the right techniques and accessories, you can achieve very good results with today's flagship phones (iPhone Pro, Samsung Galaxy S Ultra series, etc.). If you're shooting with a phone, pay attention to the following:
- Use a Tripod: The secret to sharp photos is stability. Even a small tripod for your phone will dramatically improve photo quality. It completely eliminates shake, which is essential when shooting in HDR mode.
- Turn on the Grid: Enable the grid feature in your phone's camera settings to more easily apply composition rules (especially the Rule of Thirds).
- Never Use Digital Zoom: Digital zoom simply crops and enlarges the image, severely degrading quality. If you can't fit the room in the frame, step back, but never zoom.
| Equipment | Pros | Cons |
|---|---|---|
| DSLR/Mirrorless Camera | Superior image quality, lens versatility, full manual control, better low-light performance. | High cost, requires a learning curve, bulkier. |
| High-End Smartphone | Easy to use, portable, instant sharing, good HDR capabilities. | Lack of true optical wide-angle, smaller sensor, limited manual control. |
| Standard Smartphone | Universally available, no extra cost. | Weak in low light, poor wide-angle, generally insufficient for professional results. |
The Art of Composition: Framing the Perfect Shot
A good real estate photograph doesn't just show a room; it guides the viewer's eye to the space's most important features. Composition is the art of creating that guidance.
The Cardinal Rule: Straight Lines
The most fundamental and important rule in real estate photography is that vertical lines must be perfectly vertical, and horizontal lines must be perfectly horizontal. Leaning walls and crooked door frames look unprofessional and jarring. The easiest way to ensure this is to use a tripod and keep the camera perfectly level. The shooting height should generally be at chest level (around 1.2 - 1.5 meters or 4-5 feet). This gives the room a natural, inviting perspective.
Making Rooms Look Spacious: Shoot from the Corner
The best way to photograph a room is usually from the corner furthest from the entrance. This angle provides the most depth and shows three walls of the room, enhancing the perception of size. If possible, include the room's entrance in the frame to show the flow between spaces.
Highlight the Details
In addition to wide shots of the rooms, photograph the details that make the property special. This could be a stylish kitchen faucet, a custom cabinet handle, the texture of a fireplace, the view from the balcony, or a beautiful flower in the garden. These detail shots add character to the listing and provide clues about the quality of the property.
Mastering Light: The Soul of the Photograph
Photography literally means "writing with light." Light can completely change the atmosphere of a space. In real estate photography, the goal is to make the space look bright, airy, and inviting.
Maximize Natural Light
The best time for a shoot is often on a bright, overcast day. Harsh, direct sunlight can create sharp shadows and blown-out highlights. Before shooting, open all curtains and blinds completely. Turn on every light in the room (chandeliers, lamps, spotlights). This supplements the natural light and adds a warm ambiance. Ensure all your light bulbs have the same color temperature; mixing warm (yellow) and cool (white) light creates an unappealing look.
Understanding the HDR Technique
HDR (High Dynamic Range) is a lifesaver, especially when shooting rooms with bright windows. In a normal shot, either the view outside the window is completely white, or the interior of the room is too dark. HDR works by taking multiple photos at different exposure levels (one dark, one normal, one bright) and merging them into a single image where details in both the interior and the exterior are clearly visible. Most modern phones offer this feature automatically. If you're using a DSLR, you'll need to merge the photos later using software.
Room-by-Room Shot List: A Professional's Roadmap
Every room has unique features and angles that show it off best. A systematic shot list ensures you don't miss any important frames.
- Exterior: The property's first impression. Take at least 2-3 photos from different angles. Include the street view and entrance if possible.
- Entryway/Foyer: Capture the welcoming feeling as one enters the home.
- Living Room: A wide shot from at least two different corners. A shot that highlights a focal point like a fireplace, built-in shelving, or a window with a view.
- Kitchen: An overall view, an angle showing the countertops and cabinets, and details like branded appliances or a special sink.
- Bedrooms: One wide-angle photo of each bedroom. For the master bedroom, show the transition to an en-suite bathroom or walk-in closet if present.
- Bathrooms: Must be spotless. Clearly show the shower area, sink, and cabinetry. A closed toilet lid is always more aesthetic.
- Balcony/Terrace/Garden: Emphasize the enjoyment and view from these areas. Place a table and chairs to show it's a usable living space.
- Additional Spaces: Be sure to photograph any extra areas like a pantry, laundry room, garage, or community amenities (pool, gym).
Frequently Asked Questions
1. How many photos should I include in my listing?
The ideal number is typically between 20 and 30. Too few photos (less than 10) can make buyers suspect you're hiding something, while too many (more than 40) can be overwhelming and slow down the loading of the listing. The goal is to show every important room and feature with at least one photo, and to present the most important areas (living room, kitchen, exterior) from a few different angles.
2. Should I hire a professional photographer? What is the cost?
If your property has a high value or you're not confident in your photography skills, then absolutely yes. The cost of a professional photographer in 2026 can range from $150 to $500, depending on the property's size and location. However, this investment can more than pay for itself by helping your property sell faster and for a higher price. It's not an expense; it's an investment in your sale.
3. What is the biggest mistake sellers make with their photos?
The most common mistake we see is shooting without preparation. Clutter, personal items, poor lighting, and crooked angles are all elements that instantly repel buyers. Another major error is using vertical (portrait mode) photos. Real estate listings are viewed on horizontal screens, so all photos should be shot in landscape mode.
4. Is it better to photograph a house empty or furnished?
A furnished, but properly staged, home is always better. Furniture helps to understand the scale and function of rooms and adds warmth to the home. A completely empty house can feel smaller and soulless. If the house is vacant, consider using a virtual staging service to digitally add furniture. It's a fantastic way to show the potential of an empty space.
5. How can I make a small room look bigger?
Using a wide-angle lens is the most fundamental technique. Shoot from a corner and at a slightly lower angle. Declutter the room of any unnecessary items. Using furniture and textiles that are the same color as the walls or in light tones can also expand the sense of space. Mirrors can also work wonders by reflecting light and adding depth.
6. Should I include photos of the neighborhood?
Absolutely. Buyers are not just buying a house; they are buying a lifestyle and a community. Photos of nearby amenities like a park, a popular café, the coastline, a metro station, or a school add value and appeal to your property. This is especially critical for properties where the location is a major selling point.
7. Why is it so important for vertical lines to be straight?
The human brain is conditioned to see buildings and walls as having straight, parallel lines. When vertical lines in a photo are tilted or converging, it creates a sense of unease and imbalance in our minds. This subconsciously reinforces the perception that the photo is low-quality and amateurish. Straight vertical lines, on the other hand, convey professionalism, stability, and order, which increases the buyer's confidence in the property.
Conclusion: The Photo is the Key to the Sale
Selling your home is a major financial and emotional process. In this journey, one of the most powerful tools you have to represent your property at its best is photography. A well-executed set of photos not only attracts more buyer interest but also leads to higher offers and less time on the market. By following the steps in this guide, whether you shoot yourself or work with a professional, you can be conscious of the process and achieve the best possible outcome.
Remember, every photograph tells a story about your home to a potential buyer. Make sure the story you tell is compelling, inviting, and unforgettable. In a competitive market, the attention you pay to these details will set you apart and lead to success. To plan your property's marketing strategy together and connect it with buyers at its true value, get in touch with us →.
🏠 Time for a Professional Marketing Plan
Leverage the expertise of Century21 Perfect for professional photography, video tours, and marketing strategies that will reveal your home's true potential.
📞 +90 552 688 0195 | 📧 ashkan.ahani@century21.com.tr
- How professional photos can help a property sell up to 32% faster and increase its perceived value.
- That 90% of a successful shoot depends on preparation steps like decluttering, depersonalizing, cleaning, and staging.
- How the right equipment choice (DSLR vs. Smartphone) and accessories like a tripod can radically change photo quality.
- How basic composition rules like straight lines, corner shots, and the right height can enhance the perception of space.
- The critical importance of using natural light, proper timing (the golden hour), and the HDR technique for bright, inviting photos.
- How to create a systematic shot list for each room to ensure no important feature of the property is missed.